


How to create reports in Zoho CRM
You can build new module-specific reports that relate to other cross-functional modules. You may, for instance, create reports in Zoho CRM accounts module that links to other modules like Contacts, Deals, Quotes, and so on. So, let’s take a look into step-by-step guide on creating reports in Zoho CRM
Now, there are three types of reports:
- Tabular report: In the report, the data is displayed without any subtotals. Create contact mailing lists, a consolidated picture of the sales funnel, and more with this type of report.
- Summary report: The data, as well as subtotals, groups, and other summary information, is displayed.
- Matrix report: Data is aggregated in a grid and shown in both horizontal and vertical columns.
How to create reports in Zoho CRM:
You can generate new reports based on the needs of your company. The following are the stages involved in customising a report:
- Choose Reports module & click on Create New Report.
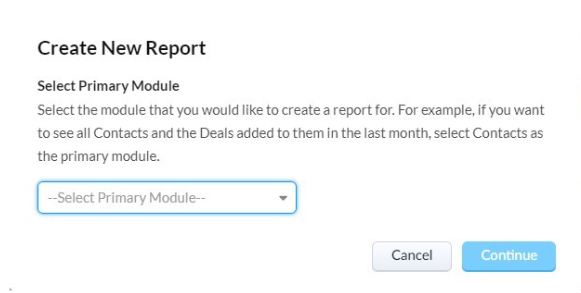
- Select the Primary module in the drop-down list.
- Click Continue
- Select the Child module if needed.
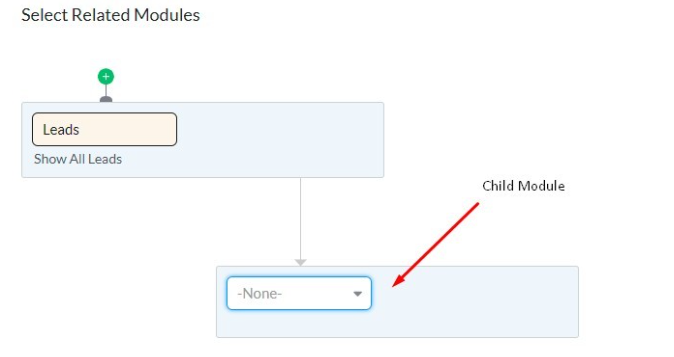
- Choose the Relationship type in the Child module.
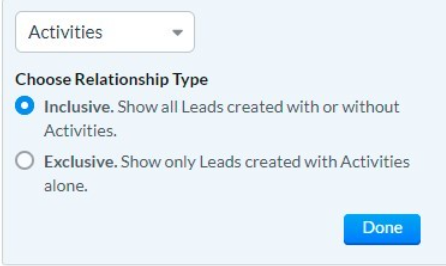
- Click Continue
- After the reports appear, click on Run/Save.

- Mention the Report name & select the folder.
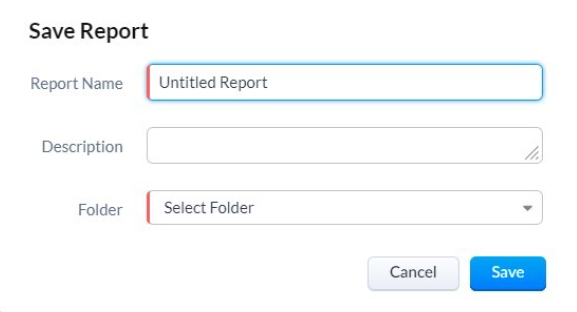
- Click on save.
Part 1: Choose a module and any cross-functional modules that go with it.
- Click on the tab Report
- Click Create Report on the Reports homepage.
- Now, follow these steps in the Create Report page
- From the dropdown list, select the primary module.
- From the related module list box select the cross functional module box. The fields from Related Modules may be used to define criteria, add columns to your report, and pick columns to total.
- Click on continue
Part 2: To select the report type
Select one of the following report options from the Report Type tab on the Create Report page:
- Tabular report
- Summary report
- Matrix report
Part 3: To select report column
- Click columns tab, in the create reports tab
- To select the columns to be displayed in your reports, do the following
- Select the columns from the available column list box.
- Click Add.
- Columns will appear in the selected column list box.
- To sort the display orders of the columns, use the Up & Down arrow keys.
- Click the red cross to delete the selected column.
- Click Save, specify the Report Name, Description & Report Folder details in the pop-up window.
- Firstly, save the report and then click on Run.
- If you’re using a Summary Report, click the Grouping tab after you’ve picked the report columns; otherwise, click the Columns to Total tab.
Part 4: To group report columns
- Click the Grouping tab on the Create Report page. This tab will only appear if you choose Summary Reports from the Report Type menu.
- You can group entries on the Grouping page using the grouping criteria you provide.
- Choose the appropriate settings from the list.
- From the list, choose Ascending or Descending.
Part 5: To select the calculation functions:
- Click the Columns to Total tab on the Create Report page.
- Select the relevant calculation functions in the Columns to Total section.
Part 6: To save report in folder
- Click Run or Save on the Create Report page. It’s worth noting that you can only run the report once you’ve saved it.
- Do the following in the Save Report dialogue box:
- Enter a name for the report.
- Fill in the report’s description.
- Choose the Report Folder where the report will be saved.
- Click save
Create a report folder
Folders are handy for organising data and sharing it with others. There are a number of basic report folders to choose from in Zoho CRM. In addition, you may make your own folder. There are two ways you can do this:
- Make a folder out of an existing report.
- Make a folder out of a new report.
You may also choose who in your company has access to the report folder.
- Only me: Only the folder creator will be able to access the reports included therein. It’s more like a personal filing cabinet.
- Everyone: The folder and its reports will be accessible to all CRM users.
- Selected user: The folder will be accessible only to the people who have been chosen. You may, for example, establish a folder called “yearly reports” to which only managers or users with higher levels have access. You won’t have to share the reports individually since once you store them in the appropriate folder, any people with access to it will be able to see them.
To create a folder from an existing report
- Select reports after going to the Reports tab.
- Select Create folder after clicking on Move to folder.
- Enter the folder name in the Create Report folder popup.
- Select the ones who can access the report.
- Only me
- Everyone
- Selected user
- Click Save & Move
To create folder while creating a report
- Go to the report tab and click new report.
- With the required parameters create a new report.
- Select Folder and Create Folder from the drop-down list under Basic Information.
- Fill in the Folder name in the Create Report Folder dialogue.
- Select the ones who can access the report.
- Only me
- Everyone
- Selected users
- Add title and description to the folder.
- Click Save
Please get in touch with us if you want to learn more about Zoho implementation and other Zoho tools. Motviz is a Zoho partner and the largest Zoho reseller, offering all forms of Zoho application support.